
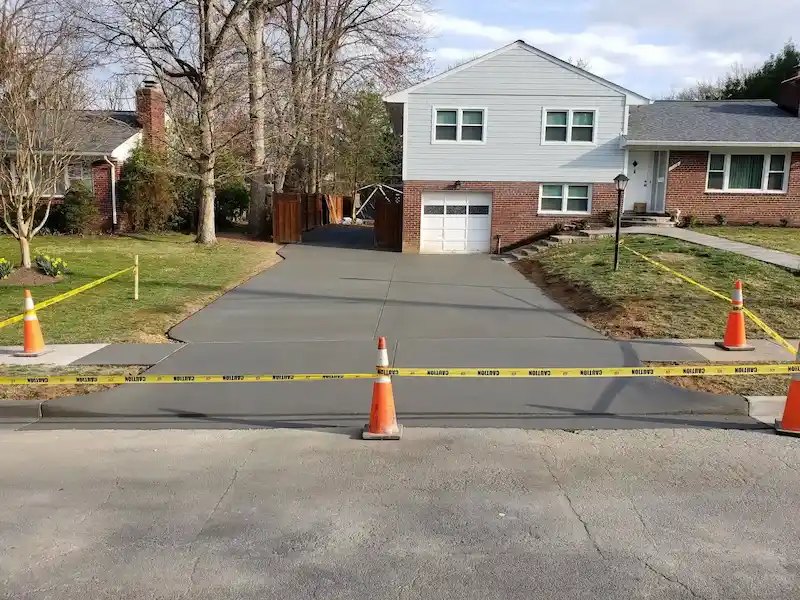
Outdoor work lives in the weather, and a little care goes a long way. This guide covers what to expect as new work settles in, what to do through the seasons, and the few things worth avoiding. It is written for whoever lives with the work, whether you had it built or came to the house later.
What is normal
New work changes as it cures and weathers. These are ordinary parts of that process.
- Hairline cracks in concrete. Concrete shrinks slightly as it cures. The grooves in the slab, called control joints, are there so the slab cracks in straight lines inside them. Fine shrinkage cracks elsewhere are cosmetic, not structural.
- Color changes while concrete cures. Fresh concrete is dark gray and lightens as it cures. For the first 30 to 60 days it can look splotchy, and through the first few months you may see darker and lighter patches, sometimes called mottling, that show most when the slab is wet. That is moisture slowly leaving the slab. The spots fade with rain, sun and weather, and it can take up to a year to reach an even final color.
- Small differences between truckloads. A large pour takes more than one truck, and two loads can cure to slightly different shades.
- New beside old. New concrete next to existing concrete reads brighter for several years. New brick, stone, pavers and mortar beside older work read as new until they weather in.
- A slight step at isolation joints. New slabs float free of the house and other slabs so each can move on its own. You may feel a slight step at a joint in January that relaxes by June.
- Tiny pop-outs. Now and then weather releases a bit of leaf or grass folded into the surface during finishing, leaving a small, shallow divot.
- Efflorescence on stone and pavers. A white, powdery film is natural salt rising to the surface. It usually works its way out over the first year and fades with normal weathering.
- The character of real stone. Veins, seams and fissures, small edge chips, and rust-colored spots from minerals inside the stone are part of natural stone. Natural cleft flagstone can shed thin surface layers through its first few freeze-thaw seasons.
- Mortar color settling. Mortar cures for about thirty days, and its color keeps settling as it weathers. Give it a year and judge color in seasons, not days.
- Wood moving. New pressure-treated lumber twists, checks and shrinks as it dries, and small gaps can open at joints.
If a crack opens wider than a quarter inch, or one side sits higher than the other, please call us.
Concrete: driveways, patios, walks and aprons
The first weeks
- Keep everyone off the wet concrete. Once the slab is finished and taped off, keep pets, children, delivery drivers and neighbors away from it.
- Walking: after 24 to 48 hours.
- Cars: wait 7 days. Concrete can look hard the next morning while it is still gaining strength.
- Rain is welcome. Once the concrete has set, rain keeps it cool and moist. A slower cure makes stronger concrete with fewer shrinkage cracks.
- Water curing is optional, and only helps if it is continuous. Keeping the surface constantly moist for roughly the first 7 days makes it harder and more durable. Either run a sprinkler or soaker hose so a film of water stays on the slab through the warm part of the day, or lay wet burlap or curing blankets and keep them soaked, with plastic sheeting over them to hold the moisture in. If you cannot keep it constantly wet, leave the slab to cure on its own. Hosing it down a couple of times a day lets it dry in between, and that wet-dry cycle can cause fine spiderweb cracking.
Every season
- Clean early. Sweep or rinse off leaves, soil and spills before they set. Use water, a mild detergent and a stiff brush that is not metal.
- For a stubborn stain, use a cleaner made for that stain and for concrete, follow its label, and test a small area first. Some stains lighten with sun and weather.
- Mind the water from the roof. Keep gutters clean and point downspouts away from the slab. Water that keeps running across the same spot leaves a track, even clean water.
- Keep lawn chemicals off the edges. Ask your lawn service to stay clear of the concrete when they spray fertilizer, weed control or pesticides, or cover the edges before they spray. Overspray eats away at the surface along the borders.
- Each fall, if you have buried downspouts, check the pop-up emitter lids in the yard. Leaves can clog them and back up the pipe.
Sealing is your choice
Concrete does not need a sealer, and we do not seal as part of our work, because a sealer can only go on long after we leave and needs the right weather. Some owners choose one to protect against stains. If you do, we point to a penetrating silane/siloxane sealer. It soaks into the concrete instead of forming a film, keeps a natural matte look, and makes water bead up. It slows staining and makes cleanup easier; it does not make concrete stain-proof.
- Wait until the slab has fully cured, commonly about 28 days. It does not have to be exactly day 28 if the weather is not cooperating.
- Apply only to clean, bone-dry concrete: roughly 48 hours with no rain before, a dry window after, and air and surface temperatures of roughly 50 to 80 degrees Fahrenheit.
- Use a low-pressure pump sprayer in even passes and do not let it puddle. Put the second coat on "wet on wet," before the first coat dries; the window is often only several minutes.
- Keep foot traffic off for at least several hours and cars off for roughly 24 to 48 hours.
- Penetrating sealers wear gradually. Reapplication is typically cited at roughly every 5 to 10 years. The product's own label and data sheet always come first.
Aprons and cold-weather pours: sometimes a permit requires a "cure and seal" film on fresh concrete, usually on aprons poured in cold weather. A penetrating sealer cannot soak in through that film; it would have to be stripped first. A cure-and-seal film generally wears off within roughly 1 to 3 years and can wear unevenly under tires.
Winter
- No de-icers in the first year. Concrete takes up to 12 months to reach full cure and chemical resistance. Through its first year, use no salt, calcium chloride, magnesium chloride, "pet safe" melt or any other de-icer. They add freeze-thaw cycles, and those cycles flake the surface.
- Clear snow and ice promptly, within about 24 hours of a storm. Never pile snow on the slab and leave it there. Sun melts a little of a pile each day, the water soaks into the concrete, and at night it freezes and expands by about 10 percent, which can push the top layer off.
- Go gently on bonded ice. When snow gets capped with sleet and freezes solid, be patient. Pickaxes, sledgehammers, metal scrapers and metal-tipped shovels chip and gouge the surface.
Please don't
- Drive on new concrete before 7 days.
- Park dumpsters, moving vans or RVs on a residential driveway, at any age. It is not built for those loads.
- Use any de-icer in the first year.
- Let snow or ice sit, or pile snow on the slab.
- Chip ice with metal tools.
- Clean with harsh acids or high-pressure washing. Both damage the surface.
- Water-cure on and off.
- Seal before the slab has fully cured, or over a cure-and-seal film.
Pavers
The first weeks
- The joints are polymeric sand. It hardens like grout but stays slightly flexible, so the pavers can move a little with the ground.
- A white haze may appear. That is efflorescence, natural salts working out of new pavers. It usually fades over the first year with normal weathering.
Every season
- Top up the joints every 2 to 3 years. Heavy rain can wash out small amounts of joint sand over time.
- Watch shaded areas. Weeds and moss can take hold in joints that stay damp and shaded.
- Clean early. Pavers stain from the same things concrete does: leaves, soil, rust, roof runoff and spills. Sweep or rinse them off before they set.
Winter
- Shovel with care. Snow shovels can chip paver edges and corners.
- Mind the edges of steps and caps. Overhanging caps and step treads can be knocked loose by a bump; see the stone section for how to reset one.
Please don't
- Power wash the joints. It blasts out the sand.
- Let leaves and soil sit wet on the surface.
- Leave thinned joints unfilled; top them up.
Natural stone and masonry
The first weeks
- Let the mortar settle in. Mortar cures for about thirty days, and its color keeps changing as it weathers. Joints on walls and on walking surfaces often look different at first, because flat surfaces take sun and rain head-on and walls are sheltered. The difference usually softens over seasons.
- White film on new stone is efflorescence and usually works its way out over the first year.
- Natural cleft flagstone can shed thin surface layers through its first few freeze-thaw seasons. That is how cleft stone behaves.
Every season
- Expect hairline cracks in mortar joints over time. Mortar is rigid and the ground moves with freeze and thaw. Plan on minor tuck-pointing, filling the cracked joints, every 3 to 5 years to keep the joints watertight.
- Travertine and marble set with grout need the same joint care as mortar. Tight-set travertine and marble, laid with almost no joint, lets water pass through the seams.
- Treat caps and step treads gently. Overhanging wall caps, seating-wall caps and step treads are held by mortar rather than by stones on all sides. Standing on the very edge of a tread, or a bump from a mower or tire, can pop one loose. The same goes for dry-stacked stone veneer, where freeze-thaw or a knock can loosen a stone.
- If a cap, tread or veneer stone pops loose, it is a simple fix. We leave spare stones at the house when we finish. Brush away the loose mortar dust and reattach the stone to its base with a premium exterior polyurethane construction adhesive.
- Rust-colored spots can come from iron and other minerals inside the stone. That color is part of the stone, not a stain on it.
- Clean early. Stone stains from the same things concrete does. Sweep or rinse off leaves, soil and spills before they set.
Winter
- Shovel with care. Shovels chip stone edges.
- Check after the thaw. In spring, look over caps, treads and veneer for any stone that freeze-thaw has loosened, and reset it as described above.
Please don't
- Acid wash or scrub manufactured brick or veneer whose color is a surface coating. It strips the finish.
- Put your weight on the very edge of a step tread or an overhanging cap.
- Bump caps and treads with mowers or tires.
- Let cracked mortar joints go for years; tuck-point them.
Outdoor carpentry and trim
The first weeks
- Pressure-treated wood seasons. As new lumber dries it can twist, warp, check (crack along the grain) and shrink. Small gaps may open at joints and fasteners. That is normal for exterior wood.
Every season
- Watch the caulk on PVC and composite trim. Even low-maintenance trim expands and contracts, and over time that breaks the caulk seals at the joints.
- One year after installation, have a painter re-caulk and paint the trim. Factory-white PVC trim lasts longest when a painter re-caulks the joints and applies a high-quality exterior paint to seal the whole assembly at the one-year mark.
Winter
- Expect seasonal movement. Wood takes on and gives off moisture with the weather, so joints open and close through the year. Note any caulk joints that open in the cold months for the painter.
Please don't
- Treat PVC or composite trim as maintenance-free.
- Skip the one-year re-caulk and paint.
Questions
If something looks off, or you are not sure what you are seeing, we are glad to take a look.
Tuck GC, Inc.
Phone: (703) 540-1000
Email: tuck@tuckgc.com